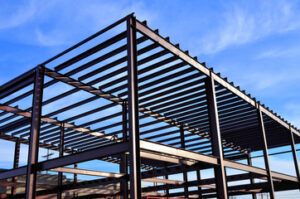
Insulation

Which Ceiling Insulation Needs Replacement?

insulation

Ceilings Perth insulation lasts for decades, but it needs to be properly maintained. It’s important to check for water damage and mold growth on a regular basis.

Wet insulation is not only uncomfortable, but it can promote mold and mildew throughout the home. Additionally, it loses its R-Value over time.

Fiberglass

Fiberglass insulation has enjoyed a long-standing top ranking for home insulation due to its affordability, ease of installation and energy efficiency. This insulating material is also environmentally friendly and comes in several forms: batts, rolls, loose-fill and spray, to meet unique insulation needs and applications.

Generally speaking, fiberglass insulation can last for between 20 and 80 years in most homes without requiring replacement. However, in that time it can lose its effectiveness. One of the main signs that it’s time for a new batch of insulation is the occurrence of a significant increase in your utility bills. This may indicate that old insulation has lost its ability to limit the flow of air and heat, making your home less efficient.

The best way to tell if your existing fiberglass insulation is still up to the task is to check its R-Value. The higher the R-Value, the more effective it will be at limiting the transfer of heat and cold. If you’re not sure what your R-Value is, it’s always a good idea to speak with an experienced and professional insulation company.

While fiberglass is an exceptionally durable insulator, it can become damaged by water. When soaked, it can cause mildew and mold to form, which could damage the wood surrounding it. If this occurs, it’s recommended that you replace the affected insulation immediately, rather than trying to dry it out.

If your fiberglass insulation isn’t soaked through, it should be able to dry out with the help of some fans and direct sunlight. In any case, if your insulation is wet, it’s a good idea to have it replaced with a more resilient and eco-friendly option.

If you’re looking for a more effective insulating option than fiberglass, consider cellulose or spray foam. While cellulose can be more expensive, it’s eco-friendly, fire-resistant and offers superior air blocking capabilities. On the other hand, spray foam is not recommended for homes with finished walls because it can be dangerous to work around and requires specialized equipment and expertise to install correctly.

Cellulose

Cellulose insulation is made from recycled paper that is treated with non-toxic borate compounds to resist fire, insects and mold. It is blown into attics and wall cavities as a dry or wet process. It’s an increasingly popular choice because it can help cut energy costs and is an eco-friendly product.

A cellulose insulation installer will remove the exterior siding around waist height before drilling a row of three-inch holes into each stud cavity and then blow in the cellulose. This method of installation is favored for retrofit insulation because it avoids disturbing the walls and other finishes in the home. It is possible to install cellulose in new construction as well, but it is less common. During the wet-spray installation process, a water hose with a high-pressure spray nozzle (similar to a pressure washer) is attached to the blowing machine. A small amount of moisture is added to the dry cellulose fiber at the nozzle to add natural starches that cause it to stick permanently to the framing materials in the wall cavities.

As its name suggests, cellulose is a chain of sugar molecules. It’s the most abundant natural polymer on Earth and is produced by plants, algae and some bacteria. It is a natural building material that can be found in cotton, wood, and hemp, for example. It’s also found in biofilms, which are communities of bacteria that ooze and glom together on surfaces.

When it comes to insulating homes, cellulose is often used for its R-value, or resistance to thermal flow. It provides an R-value of 3.6 to 3.8 per inch, which is comparable to fiberglass insulation. However, it’s more expensive to install than fiberglass, and the material and labor cost tend to rise as the R-value increases.

In addition, cellulose is heavier than fiberglass and requires more space to install in an attic. It can also be difficult to install properly. An experienced certified attic specialist is needed to ensure the cellulose insulation is densely packed, properly applied and air-tight. Additionally, the cellulose is sensitive to moisture and needs to be protected against condensation.

Rock Wool

Rock wool (or mineral wool) is an environmentally friendly insulator made from actual rocks and minerals. This enables it to block heat and sound in ways that fiberglass cannot. It is available in several forms, including boards that can be inserted between wooden beams in pitched roofs. It is also available in batts and rolls, and in a loose-fill form that can be applied in hard-to-reach spaces.

This insulation has higher R-value per inch than fiberglass, enabling it to prevent energy leakage in attics. It is a great option for re-insulating existing homes and building. It also is a good choice for new construction and commercial buildings that need a high level of thermal insulation. It is also resistant to moisture, which reduces the risk of mildew and mold.

It is made from natural basalt and recycled slag materials, which makes it an eco-friendly product. Rockwool insulation does not contain asbestos, and independent tests have verified that it poses no health risks to the human body if handled properly. However, it is a good idea to wear protective gear during any installation project to ensure that the material does not cause any skin or respiratory irritation.

The thick structure of rock wool also helps it absorb and deflect sound waves, making it a great choice for insulating walls and ceilings in residential and commercial buildings. It can also be used in attics to help improve comfort and safety by reducing noise from outside, as well as keeping the temperature of the home or office more stable.

When insulated correctly, rock wool can save homeowners 50% on heating and cooling costs in certain climates. This translates to substantial savings on utility bills, as well as reduced energy consumption and CO2 emissions. It is also fire resistant and will not rot or mildew, making it an excellent choice for retrofitting older buildings.

Unlike fiberglass batts, spray foam or loose-fill options, rock wool insulation is easy to install in existing buildings. Its rigid board design can be cut and shaped to fit around wall obstructions, ensuring a more seamless installation. Its hydrophobic nature repels moisture, and it is a safe alternative to combustible spray foams that require air sealing, protective equipment, and hazardous off-gassing.

Batt Blanket

A staple in many homes, blanket insulation is available as either batts or rolls. It is made of small fibers—mostly fiberglass but sometimes mineral wool (rock and slag), plastic fibers, and natural fibers like cotton or sheep’s wool. This type of insulation is commonly installed in walls and ceilings to help reduce energy consumption and maintain a comfortable temperature year-round.

When choosing the right type of insulation for your home, consider both the R-value and the density of the insulation. The higher the R-value, the more efficient the insulation is. R-values are calculated by measuring the thickness of the material, while density is determined by the number of air pockets within the insulation.

The most recognizable type of blanket insulation is the pink fiberglass batts that are commonly used in attics and walls. These can provide a high R-value and are often used in cathedral ceilings. If you choose to use these types of blanket insulation, make sure it is without a vapor retarder. This is important because a paper vapor retarder can trap moisture, which can lead to mold and rot.

Another advantage of using blanket insulation is that it can be cut to fit around electrical wires. It is also easier to install than blown-in insulation, which may require the use of special equipment.

One drawback of blanket insulation is that it tends to settle and lose its R-value over time, meaning that it can need to be replaced more frequently than other types of insulation. In addition, it is less effective in colder climates than blown-in insulation.

If you are considering using blanket insulation, it is a good idea to hire a professional for installation and removal services. This is because it will ensure that the job is completed properly and efficiently. Additionally, it will prevent any contaminants from contaminating or damaging the new insulation when it is removed.

When choosing the type of insulation for your home, it is best to consult with a professional to get a better understanding of what R-value will work best in your location and climate. The professional will be able to guide you on the best type of insulation for your home, as well as help you decide on the right R-value for your budget.

Plumbing

Flow Restoration: Effective Strategies for Unclogging Drains

Clogged drains can cause a huge mess. Preventing them requires good drain habits and routine maintenance using safe products.

drain cleaning

Whether from hair strands, grease, non-flushable waste or accidentally flushed items, clogs can be annoying and dangerous. Knowing when to call for professional Philadelphia Drain Cleaning can help you avoid costly repairs.

A drain cleaner is an industrial-strength chemical that attacks a clog to dissolve it and allow water to flow freely again. Liquid, gel, foam, crystal, and powder cleaners all differ in formulation but typically contain bases or acids that attack organic materials like hair, grease, and paper. Most liquid drain cleaners start working on contact and, when allowed to sit for a few minutes or more, can disintegrate even the most stubborn blockages that include hair, grease, and food debris. They are easy to use, just pour down the drain and wait for the clog to be cleared.

Acidic chemical drain cleaners, which are usually only available to professional plumbers, have a very strong pH and can burn your skin and eyes, as well as damage your pipes. They work by creating a chemical reaction that generates heat within the pipe walls to melt and dissolve materials like congealed grease. This type of drain cleaner is only recommended for the most severe clogs, as repeated use can damage the plastic polyvinyl chloride (PVC) pipes that are commonly found in modern homes. It can also cause the joints that connect the pipes to leak, requiring replacement.

If you must use a chemical drain cleaner, follow the directions closely and be sure to wear rubber gloves and goggles to protect your eyes and skin. These products are also very hazardous to the environment if they seep into groundwater or soil, where they can contaminate drinking water and harm plants and animals.

In addition, many chemical drain cleaners rely on a strong acidic substance such as hydrochloric acid (muriatic acid) to create the necessary reaction inside your pipes. This can corrode or break down the PVC pipes that are common in modern homes, and may even damage older metal pipes.

If you’re looking for a safer alternative to chemical drain cleaners, try an enzyme-based product that relies on bacteria cultures and concentrated enzymes to break down waste. These natural cleaners are much more environmentally friendly, and can often clear clogs just as effectively as the harsh chemicals. However, they usually take a bit longer to work, and require you to not flush anything down the drain for several hours afterward.

Biological Drain Cleaners

Unlike caustic chemical cleaners, biological drain cleaners don’t use any harsh materials to eat through a clog. Instead, they introduce bacteria into your plumbing system that consumes organic waste and removes it from the pipes. Bio drain cleaners are safe for all types of pipes, and they don’t damage or corrode them like their chemical counterparts. They’re also safer for people, pets and the environment.

Biological cleaners come in liquid and dry powder form, and both work the same way. When mixed with water, they create billions of tiny bacteria that begin eating away at the organic waste in your pipes and drains. The bacterial colonies double every 30 minutes, quickly eating through anything in their path and leaving your pipes clean and smelling fresh. Unlike chemical cleaners, they’re safe for kids and pets and don’t leave behind any residue or odor.

Enzyme drain cleaners are another option, but they don’t eat through a clog the same way biological cleaners do. Instead, they liquefy fats, oils and greases (FOG) so that they can pass through your pipes and sewer system without solidifying. This process can take a while, and it may not be as effective for all types of pipes or septic systems.

When using a biological drain cleaner, it’s important to follow the instructions carefully. Most products require that you pour the solution down a drain when it won’t be used for six to eight hours. This gives the bacteria time to start working on the clog before you need to use your drain again. Many also recommend running hot water down the drain afterward to flush out any remaining bacteria and waste and prevent the clog from returning. Performing regular maintenance treatments with biological drain cleaners can keep your home’s plumbing working smoothly and reduce the need for expensive repairs.

Chemical Drain Cleaners

Chemical drain cleaners are much more powerful than liquid drain cleaners and operate through a process of chemical reactions that donate or receive electrons from the substance creating the clog. This chemical reaction produces heat that can melt or dissolving the clog. However, chemical drain cleaners do come with many safety concerns including a potential for harming pipes, posing health risks and emitting harsh fumes.

Most chemical drain cleaners require that the user follow a specific set of instructions to use safely. These typically include running hot water down the drain for at least 15 minutes after using the chemical cleaner. This helps to flush out any remaining chemicals and prevents them from damaging the pipes. Most chemical drain cleaners also have a warning label that advises users to wear rubber gloves and eye protection. These precautions help to prevent the chemicals from coming into contact with the skin or eyes and can prevent serious chemical burns.

Another important consideration is that most chemical drain cleaners produce a lot of heat during their chemical reactions. This heat can melt or warp plastic pipes and cause metal ones to corrode over time. It’s also important to consider if your home has a septic system, as the chemicals can kill the bacteria that naturally breaks down organic waste in your septic tank.

While chemical drain cleaners can be effective for some clogs, they are not recommended for most. Most reputable plumbers will recommend that you try more natural methods before resorting to chemical drain cleaners. These include using a drain snake or plunger. These tools are often more successful at removing severe clogs than liquid drain cleaners and can be much safer to use.

In addition, if you have used chemical drain cleaners in your home before calling for professional services, be sure to let the plumber know. This will help them better determine what the underlying problem is and how best to solve it. It will also ensure that the plumber uses safe and appropriate methods when working on your pipes.

Snakes

For serious drain clogs that a plunger simply can’t handle, you need a power alternative like a snake. The kind of snake you buy for a few bucks at the hardware store can’t compete with the powerful, highly specialised (and extremely expensive) drain snakes used by professional plumbers every day — but for simple, shallow blockages, they work just fine.

A basic drain snake consists of a long coil of metal wires attached to a crank on one end. You feed the end of the snake into your clogged pipe, and you crank the handle to push the snake down the pipe, jiggling it and applying pressure when needed to help the snake get around tight bends. The metal tines on the tip of the snake can break up and entangle soft blockages, while the hooks can grab hair and other debris.

Using a snake is far less invasive than using chemical cleaners, and you can use it multiple times without fear of damage to your pipes. It’s also much cheaper than calling in a professional plumber, and it can save you the cost of purchasing and using chemical drain cleaners.

If you want to avoid costly clogs in the future, invest in a quality sink strainer that can catch larger items of food and prevent them from entering your drain pipes in the first place. Also, always throw away garbage in a trashcan instead of dumping it down the drain, and never flush paper products down the toilet.

It’s important to learn how to use a snake before a stubborn drain problem gets out of hand, because you may not have access to a professional plumber in a hurry. Besides, being able to slither a snake through your drains yourself will be far more cost-effective than buying and using a lot of expensive chemical cleaners. It’s also a good idea to know how to use a snake for preventative maintenance, because stubborn drain clogs can strike at any time. And of course, it’s always better to avoid them altogether by practicing good plumbing habits.

Electrician

Essential Guide To Choosing And Installing Solar Panels

Solar panels are a long-term investment, so you’ll want to make sure that you’re choosing the best ones. In addition to price, other factors to consider include efficiency, durability, and certifications.

This comprehensive guide will help you navigate the entire process of going solar, from assessing your energy needs to finding a qualified installer and obtaining permits. Look for Solar Installation Darwin professionals to get started.

solar installation

Assess Your Energy Needs

Figure out how many panels your home needs by assessing your current energy usage. Look at the kilowatt-hours (kWh) you use every month as measured by your electric utility bill. It is best to have this number ready before you meet with a solar panel company, as the amount of energy your system produces will depend on several factors such as your location, the efficiency and output of the panels, and more.

Your average energy consumption is important to determine because it impacts the wattage capacity that you need from your solar panel system. This in turn dictates how much electricity your home or business can produce, and it is necessary to know this to maximize the benefits of going solar.

You can find your average energy consumption by looking at the kWh on your last 12 monthly electric bills and calculating it from there. You should also factor in any potential future additions to your electric appliance line, including an electric car.

Depending on your specific needs and goals, there are various types of solar panels that you can choose from. Monocrystalline solar panels are the most common and come in different sizes. They have a uniform dark appearance and rounded corners and are most efficient, meaning that they can convert more sunlight into electricity than polycrystalline or thin-film solar panels. They are also less prone to high-temperature effects and are the most affordable.

Other factors to consider are your roof size and type, as well as any nearby trees that could shade the panels in the future. Your local solar panel company will be able to provide you with a detailed assessment, recommendations, and estimates based on your particular needs. Once you have chosen an installer, be sure to carefully review their proposal and ask questions if needed.

Choose The Right Panels

The most significant investment in a solar energy system is the panels themselves, and it is important to make sure that you have the right ones for your needs. This can be done by assessing your electricity usage and then using our solar sizing guide to determine how many solar panels you will need. In addition, you will want to consider the type of panel, since this will impact how much energy it can generate. Other considerations include your location and whether or not you want a storage system for your energy.

Once you have a good idea of how many solar panels you will need, you can begin researching different options. A few key things to keep in mind when choosing a solar panel are efficiency and yield, warranty, durability, and aesthetics. The last of these can be especially important if you live in an area with high temperatures, as this will impact the performance of the panels.

In addition, you will want to compare prices to make sure that you are getting the best deal possible. Be sure to take into account the total cost of the system, which will include hardware, installation, connecting to the grid, permits, sales tax, and a warranty.

Once you have decided on a panel type, you will also need to determine how your system will be wired. This will help you create a diagram of the electrical configuration, which is required for permitting. Depending on your energy needs and available space, you may need to use a series or parallel wiring configuration. You will also need to decide if you are going with a hybrid or off-grid system and then choose the appropriate battery size.

Find A Reputable Installer

Before you make any commitments, be sure to research the installers you’re considering. You can find information online through Better Business Bureau searches and by plugging in the name of each installer. You can also ask friends and neighbors who have gone solar about their experiences with different companies.

Look for reviews that give standard metrics, such as the number of years in business, if they have any certifications, and whether they offer a money-back guarantee. Be wary of a company that only has star ratings without narratives. They may be able to attract customers with low prices, but they won’t be able to provide you with the quality system you deserve.

When you’re comparing quotes, make sure that each one lists the energy savings you can expect, as well as the cost of the equipment and installation. Look for a solar company that offers multiple financing options, and consider the impact of any local incentives on your project’s cost. It’s also important to decide whether you’ll purchase the solar panels outright, pay them in installments, or lease them. This decision has a big effect on the financial investment and tax consequences of your project.

When comparing quotes, be sure to choose a solar company that uses high-quality equipment and employs its installation crews. Be wary of companies with overly pushy salespeople, and avoid ones that use prices that are too good to be true. Once you’ve found an installer, be sure to read your contract carefully. It should reflect all of the information you’ve discussed with the installer, and it shouldn’t contain any surprises down the line. It’s also a good idea to make sure the company you choose carries a workmanship warranty.

Get Permits

In most states, a permit is required to install solar panels because your solar energy system will connect to the utility company. The permitting process is enforced by your municipality, city, or town’s building department to protect residents and ensure safety protocols are followed. In some cases, it may be necessary to also obtain a permit from your local fire department.

Many solar installers will take care of the permits on your behalf. They will first work with you to figure out what kind of system you need, then design it and provide you with an itemized quote. The final quote will usually include the permitting costs and fees. If you are going to get a permit on your own, start by searching the web with a query like “solar permitting [your location]” and then check with your city planning office or city utilities to see what is required in your area.

Most solar systems require an electrical permit and a construction work permit. The electrical permit must be issued to a licensed master electrician (LME), and the construction work permit must be issued to a general contractor.

It is also important to hire a professional engineer to verify that your home’s roof is engineered to support the weight of a solar system. If it is not, then you will need to repair or replace your roof before installing a solar system. After the construction and inspection are complete, the AHJ will stamp your permit and you can start generating electricity with your solar panel system. A post-installation inspection is typically conducted by a building inspector and a utility representative to ensure the system meets code and fire safety requirements.

Complete The Installation

Once all the paperwork and permits are in place, the installation of your solar panels can begin. This usually takes about three to six months to complete. However, it may take less time if you hire a professional to do the work.

Before starting the installation process, it is important to assess your energy needs and choose the right panels for your home. You will need to determine how much power you need to power all your appliances, lights, and other electrical devices. To do this, you will need to use a sizing tool. A sizing tool will help you determine how many solar panels your home will need. It is important to not underestimate your power requirements, as you will end up spending more on your system than necessary. It is also a good idea to compare prices and features of different solar panel options. Make sure to consider key specifications, such as size, efficiency, and weather resistance.

Installing the batteries and inverter is the next step in the solar panel installation process. The battery will store the electricity that is produced by your solar panels, and the inverter will convert the DC power from the batteries into AC power that can be used throughout your house. Once these are installed, it is a good idea to install an energy meter. This will allow you to see how much electricity your solar system is producing and how much you are using.

Finally, you will need to set up a monitoring system to keep track of your system’s performance. This can be done through a website or an app, which will notify you of any issues with your system. Depending on your location, you might need to get an onsite utility inspection before your PV system is activated.